
Flex.2-preview
Open Source 8B parameter Text to Image Diffusion Model with universal control and inpainting support built in. Early access preview release. The next version of Flex.1-alpha
Features
- 8 billion parameters
- Guidance embedder (2x as fast to generate)
- Built in inpainting
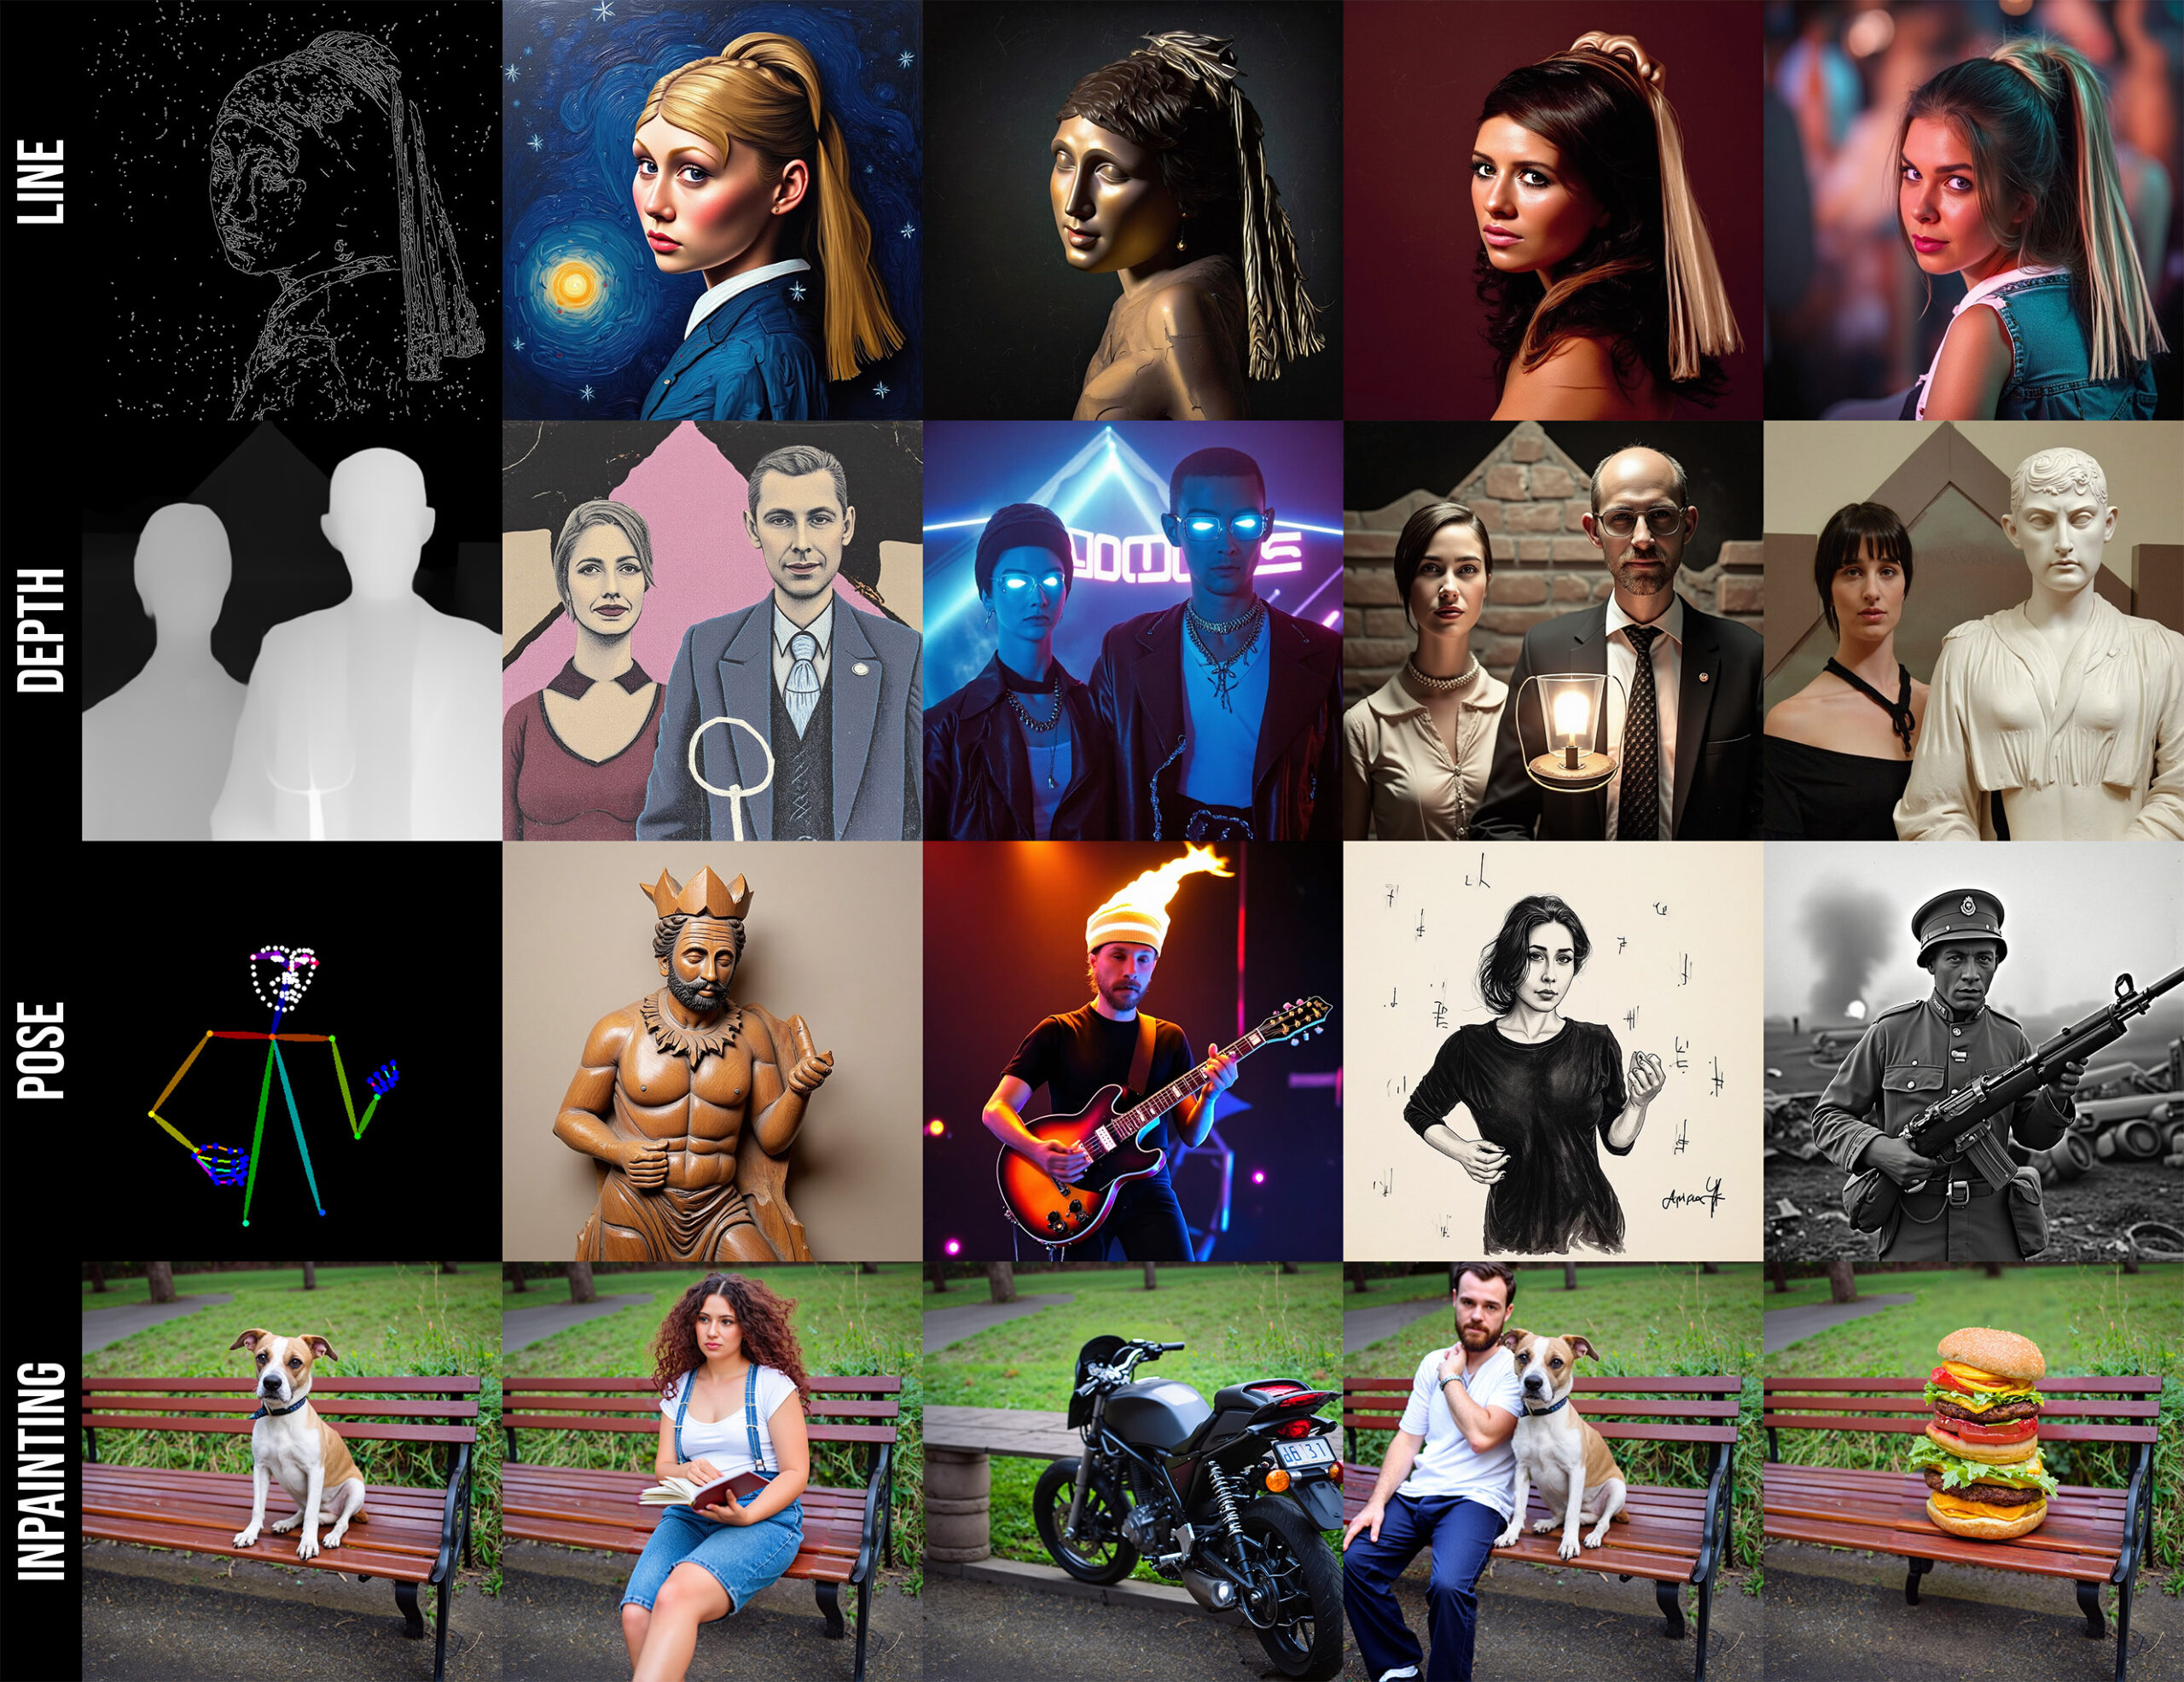
- Universal control input (line, pose, depth)
- Fine tunable
- OSI compliant license (Apache 2.0)
- 512 token length input
- 16 channel latent space
- Made by the community, for the community
About
Flex.2 is currently the most flexable text to image diffusion model released, making it truely live up to its name. It has taken a lot to get here:
Flux.1 Schnell -> OpenFlux.1 -> Flex.1-alpha -> Flex.2-preview.
Numerous improvements have been made with every step, but Flex.2 is the biggest step so far, and best of all, it was just trained by a some guy who relies 100% on community support to make a living and fund the outrageous compute cost needed to keep training models like this. Speaking of which, and since you brought it up, not me, I am always in need of support. Everything I create is free and open, with permissive licenses. So if you find my work beneficial, or use it in a commercial setting, please consider contributing to my continued desire to live and develop more open source projects and models. Visit the Support section below to find out how you can help out and see the awesome people who already do.
Flex.2 preview is an early release to get feedback on the new features and to encourage experimentation and tooling. I would love to hear suggestions as well as be made aware of weak points so I can address them while training continues. Flex.2 is a continuation of Flex.1-alpha, with a lot of goodies thrown in. The most important new features and improvements over Flex.1-alpha are:
- Inpainting: Flex.2 as built in inpainting support trained into the base model.
- Universal Control: It has a universal control input that has been trained to accept pose, line, and depth inputs.
I wanted to put all the tools I use and love straight into the base model so one model is all you need to empower creativity far beyond what a simple text to image model could ever do on its own.
Usage
ComfyUI
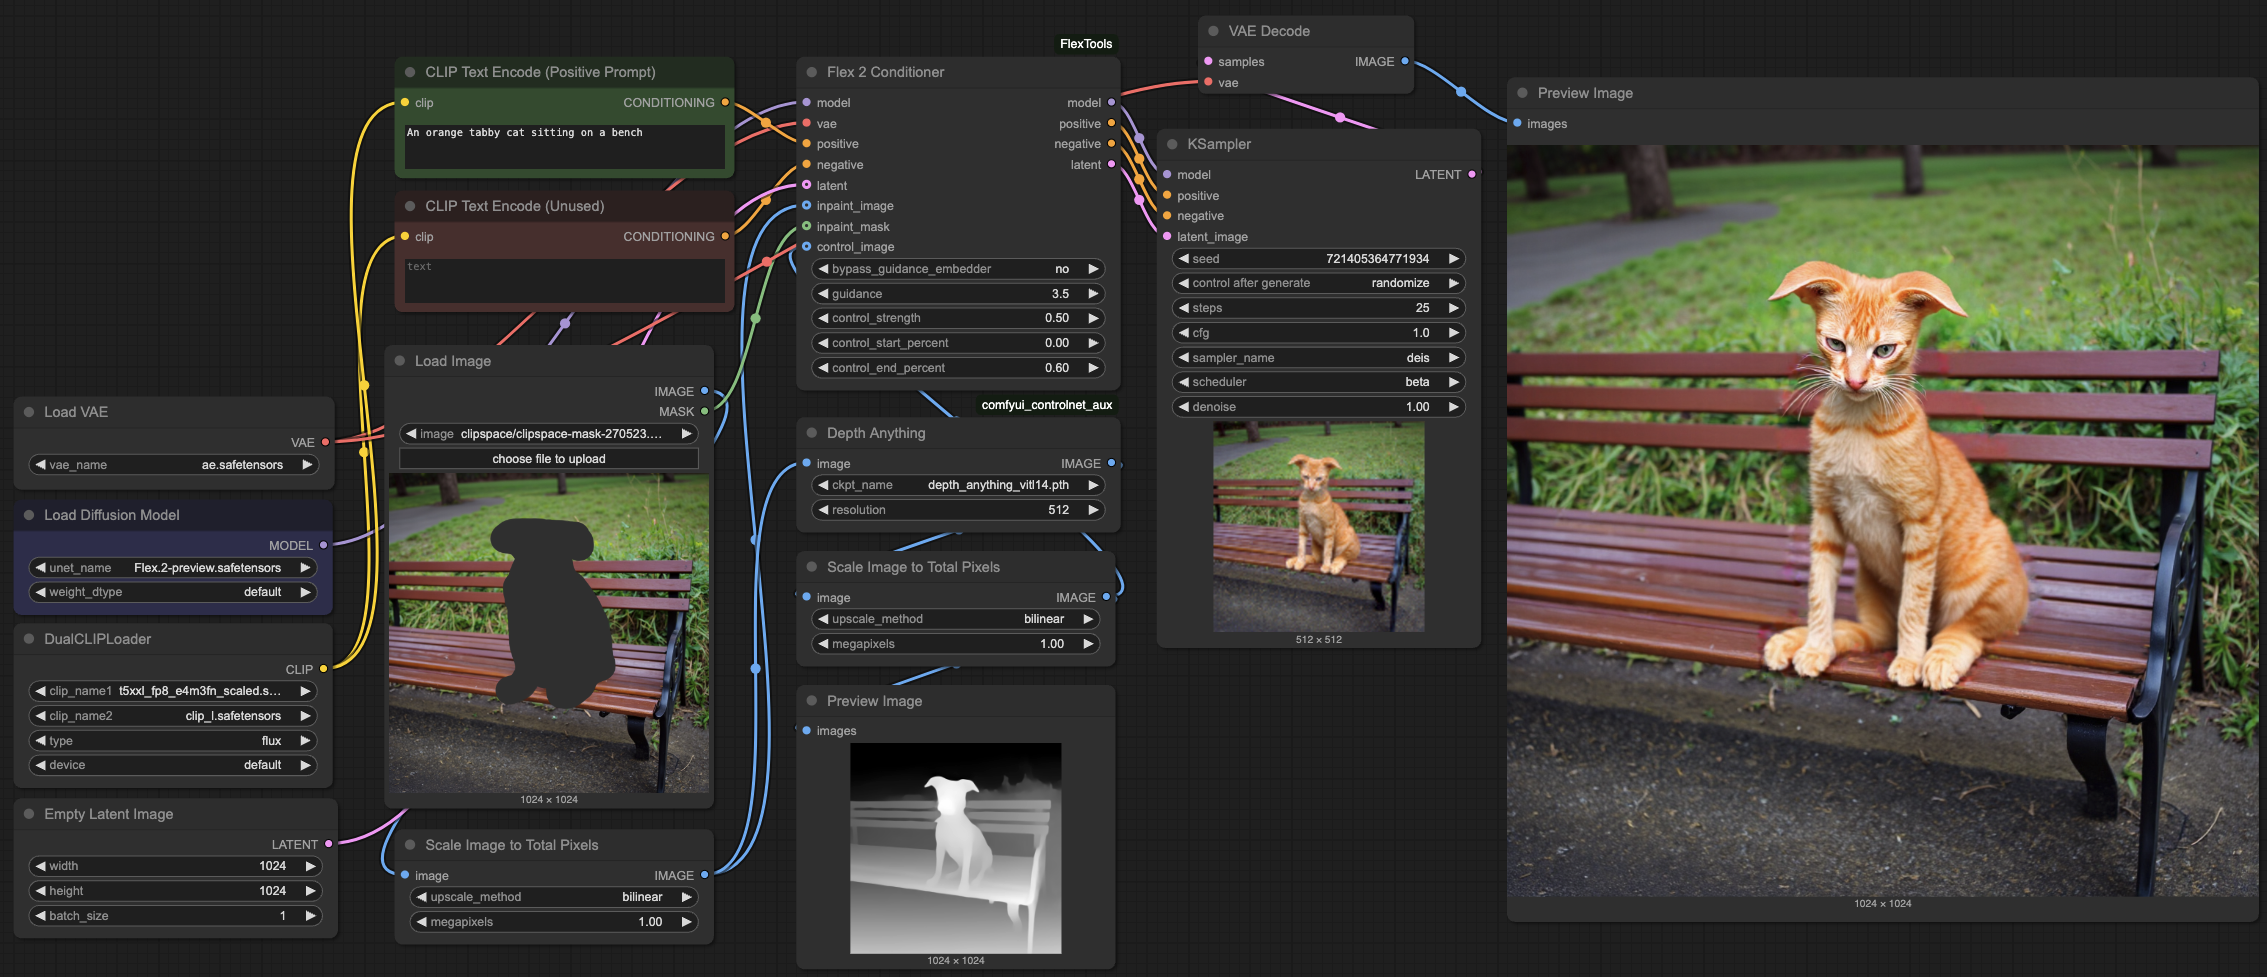
Flex.2 is supported in ComfyUI with the help of the Flex2 Conditioner node found in ComfyUI-FlexTools. I also recommend using comfyui_controlnet_aux to generate the control images (pose and depth) This conditioning node handles all of the controls and inpainting conditioning for you, but is also needed for normal T2I generation. So grab and install those first.
For the model, follow the directions for flux for the vae and text encoder models from the ComfyUI examples. You dont need the diffusion_model. If you have Flux in Comfy, you can probably skip this step. Then download Flex.2-preview.safetensors to ComfyUI/models/diffusion_models/Flex.2-preview.safetensors and restart Comfy. You can use the workflow in this image as a starting point example for controls and inpainting.
Diffusers
For diffusers, you can use AutoPipelineForText2Image. This will load the model with the pipeline located here. We will run this example using the diffusers library.
First install the requirements.
pip install --upgrade torch accelerate transformers diffusers
Then you can load the model and use it like this:
import torch
from diffusers import AutoPipelineForText2Image
from diffusers.utils import load_image
name_or_path = "ostris/Flex.2-preview"
inpaint_image = load_image("https://ostris.com/wp-content/uploads/2025/04/dog.jpg")
inpaint_mask = load_image("https://ostris.com/wp-content/uploads/2025/04/dog_mask.jpg")
control_image = load_image("https://ostris.com/wp-content/uploads/2025/04/dog_depth.jpg")
dtype = torch.bfloat16
pipe = AutoPipelineForText2Image.from_pretrained(
name_or_path,
custom_pipeline=name_or_path,
torch_dtype=dtype
).to("cuda")
image = pipe(
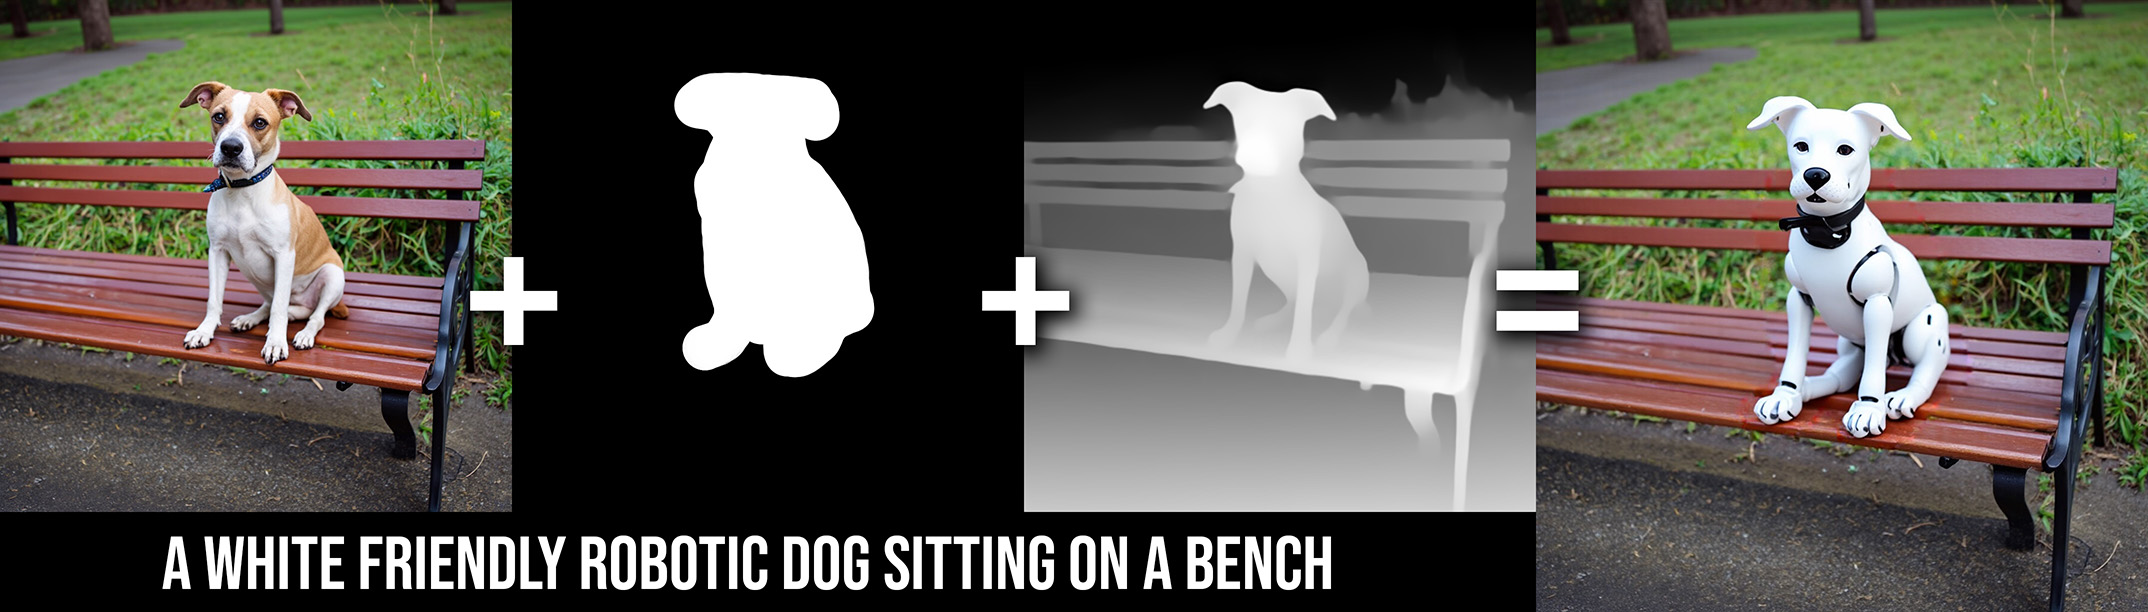
prompt="A white friendly robotic dog sitting on a bench",
inpaint_image=inpaint_image,
inpaint_mask=inpaint_mask,
control_image=control_image,
control_strength=0.5,
control_stop=0.33,
height=1024,
width=1024,
guidance_scale=3.5,
num_inference_steps=50,
generator=torch.Generator("cpu").manual_seed(42)
).images[0]
image.save(f"robot_dog.png")
For consumer cards < 24GB, you can use torchao to
pip install --upgrade torchao
Then you can load the model and use it like this:
import torch
from diffusers import AutoPipelineForText2Image
from diffusers.utils import load_image
from transformers import T5EncoderModel, TorchAoConfig
from diffusers import FluxTransformer2DModel

name_or_path = "ostris/Flex.2-preview"

inpaint_image = load_image("https://ostris.com/wp-content/uploads/2025/04/dog.jpg")
inpaint_mask = load_image("https://ostris.com/wp-content/uploads/2025/04/dog_mask.jpg")
control_image = load_image("https://ostris.com/wp-content/uploads/2025/04/dog_depth.jpg")

dtype = torch.bfloat16

quant_config = TorchAoConfig("int8_weight_only")

text_encoder_2 = T5EncoderModel.from_pretrained(
    name_or_path, subfolder="text_encoder_2", torch_dtype=dtype, quantization_config=quant_config
).to("cuda")

transformer = FluxTransformer2DModel.from_pretrained(
    name_or_path, subfolder="transformer", torch_dtype=dtype, quantization_config=quant_config
).to("cuda")


pipe = AutoPipelineForText2Image.from_pretrained(
    name_or_path,
    transformer=transformer,
    text_encoder_2=text_encoder_2,
    custom_pipeline=name_or_path,
    torch_dtype=dtype
).to("cuda")

image = pipe(
    prompt="A white friendly robotic dog sitting on a bench",
    inpaint_image=inpaint_image,
    inpaint_mask=inpaint_mask,
    control_image=control_image,
    control_strength=0.5,
    control_stop=0.33,
    height=1024,
    width=1024,
    guidance_scale=3.5,
    num_inference_steps=50,
    generator=torch.Generator("cpu").manual_seed(42)
).images[0]
image.save(f"robot_dog.png")
Limitations
This model is still experimental and under active development. The training for the controls and inpainting was pretty aggressive, and the model currently struggles with a few things such an anatomy and text. The inpainting is also still being worked on. This is just a preview release. I am working on improving these limitations with each new training run.
Fine Tuning
Flex.2 is designed to be fine tunable, though the best pratice for doing so is still highly experimental as a model like this has not really existed before. You can train traditional LoRAs directly on a model that can do controls and inpainting. Flex.1-alpha LoRAs also tento to work well with it. Day 1 support is already live for LoRA training with AI-Toolkit with built in functionality to automatically generate the controls and inpainting inputs for your existing datasets. Check out the example config file and read through the comments to see how it works train_lora_flex2_24gb.yaml
You can also make your own controls and teach the model to use them by training a simple LoRA in no more time than it would take to train a normal LoRA.
Feedback
I would love to hear feedback on the model and on things that need improvement. Please Join my Discord. I am also open to suggestions for new features and improvements.
Control Implementation
The technical stuff for those implementing tools and inference for it. General users can skip this part.
The control and inpainting implementation work similar to Flux controls, though the inpainting is slightly different. For Flux/Flex has a 16 channel latent space that is packed at half the size into a 64 channel latent. The controls can be added before or after packing, but for suimplicity, I will describe them on a 16channel unpacked latent.
(16ch = Noisy latent) + (16ch = VAE encoded inpainting image) + (1ch = inpainting mask) + (16ch = control input) = 49 channels
- 16ch Noisy Latent - This works as it has previously and is the normal input for a Flex/Flux model.
- 16ch VAE encoded inpainting image - The inpainting image is encoded using the VAE without any masking. Once in the latent space. The desirec inpait section is zeroed out by multiplying by the inverted mask. To disable this input, simply feed 0s for these channels to indicate the entire image is inpainted.
- 1ch Inpainting mask - The inpainting mask is a single channel image that indicates which pixels are inpainted. The mask is 0 for pixels in the inpainting image to keep and 1 for the area to inpaint. The mask can just be scaled down directly from the pixel space. To disable this input, along with inpainting, feed 1s for this channel to indicate the entire image is inpainted.
- 16ch Control input - A VAE encoded control input. The model was trained on pose, line, and depth inputs. To disable control, simply feed 0s for these channels to indicate no control input.
For normal T2I generation without any controls or inputs, you simpley need.
model_input = torch.cat([
    latent, # Noisy latent
    torch.zeros_like(latent), # VAE encoded inpainting image
    torch.ones_like(latent)[:, 0:1, :, :], # 0 - 1 inpaint mask
    torch.zeros_like(latent) # VAE encoded control input
], dim=1)
Support My Work
If you enjoy my projects or use them commercially, please consider sponsoring me. Every bit helps! 💖
Sponsor on GitHub | Support on Patreon | Donate on PayPal
Current Sponsors
All of these people / organizations are the ones who selflessly make this project possible. Thank you!!
Last updated: 2025-04-23 18:04 UTC


- Downloads last month
- 84